Agriculture has changed in many ways during the last 50 years. One of the greatest changes has been the use of no-till planting methods.

The problem of soil erosion with conventional row-crop production has been significantly decreased by using herbicides to kill a cover crop and planting without tillage. Though often overlooked, no-till technology is well-suited to be used in forage crop establishment.
Why use no-till?
Many fields in some areas of the country have been planted to permanent pastures because they were too steep to conventionally plant row crops such as corn or soybeans.The potential for soil erosion was so great that a perennial plant had to be used to prevent yearly seedbed preparation and the soil erosion inevitable with crop production on these slopes. The main advantage to no-till planting is to conserve soil and decrease erosion.
No-till planting has several other advantages. Planting is able to occur soon after a rain using no-till, while the soil must be allowed to dry before disking when conventional planting is used.
After planting, the soil retains moisture longer when no-till is used, because the soil is not directly exposed to the sun. Cost comparisons between conventional and no-till planting generally show the expenses for both to be similar.
No-till plantings require less fuel and labor than conventional planting, but require a chemical kill of the existing vegetation.
Characteristics needed in no-till drills
Good no-till drills need to be able to place seed at the right depth, at the right rate and in good contact with soil. They need to do this across a wide range of soil-water contents, soil types, slopes and residue cover.Listed below are some characteristics to consider in choosing or using a no-till drill.
• Weight
A no-till drill needs enough weight to let coulters and seed openers penetrate firm soil, allow press wheels to close the seed furrow and keep drive wheels or coulters in good contact with the ground.
Depending on soil-water content, depth of planting and the setup of the drill, this may require 300 to 600 pounds per foot of width. Because weight needs vary, most drills have weight brackets to add weights or barrels that can be filled with water.
• Coulters
Many drills use coulters to cut through residue in front of seed-furrow openers. In general, narrow coulters less than 1 inch wide disturb less residue, require less weight and work better across a wider range of conditions than wide-fluted coulters.
Either narrow-ripple or smooth-edge ripple (bubble) coulters work well on drills. Coulters should be as close to openers as possible for better tracking on hills. Generally, coulters should be run at the depth of seeding or slightly deeper.
Some drills use offset double-disk openers or angled, single-disk openers instead of coulters. These drills require less weight to penetrate the soil and have fewer moving parts. Disk openers wear out more quickly on these drills, and the coulter may be useful in heavy residue.
• Seed furrow opener
Double-disk openers or single-disk openers give more consistent depth of seeding and handle heavy residue better than hoe or shovel openers. They are particularly better for shallow planting of small seed, such as alfalfa and clovers.
• Depth control
Seeding depth is usually controlled by the press wheels or by depth gauge wheels mounted by the seed openers. Some drills rely on coulter depth to set seeding depth, but this method will not give as consistent results.
In choosing a drill, it is important that seeding depth be easily adjustable and that there be a simple, fast method to set all units at the same depth.
• Press wheels
Press wheels cover the seed, firm the soil and control seeding depth on many planters. Generally, either single 2-inch press wheels or two narrow press wheels in a V-shaped configuration work well on no-till drills.
Single, narrow press wheels (1 inch wide) will not control depth well in soft soils and should be used only if depth is controlled by gauge wheels. Press wheels wider than 2 inches will not close the seed furrow in no-till unless they have ribs on either side of the furrow.
The angled, V-shaped press wheels work well on hard ground, but may clog in heavy residue like corn stubble. Staggering the press wheel/seed opener units helps reduce clogging.
• Seed metering
Most drills have internally fluted metering mechanisms that are easy to adjust and are suitable for a wide range of seeds. However, for small-seeded legumes or light, fluffy seeds like some of the warm-season prairie grasses, special seed box attachments may be needed.
• Power requirements
Pull-type drills need five to seven horsepower per foot of width. Mounted drills need 10 to 15 horsepower per foot for adequate lift capacity.
• Tracking
Proper tracking, with the seed opener and press wheels following in line behind the coulter, is often a problem on hilly ground or in turns. Drills that have coulters as close as possible to the openers or that do not need leading coulters have less problems with tracking.
Wider coulters help by tilling a wider zone, but they require more weight.
• Maintenance and operation
If you own a no-till drill, be sure to follow recommended maintenance practices. Be familiar with operating procedures as described in the owner’s manual.
Always inspect the drill well before use and replace broken or worn parts that will affect drill performance.
Many forage producers rent drills. The age, type and maintenance of these units will vary greatly. If you rent, be sure you understand how to adjust the seeding rate, how to change the seeding depth, how the weight and ballasting system works and what the horsepower and hydraulic requirements of the drill are.
Inspect the drill when you pick it up for worn, broken or missing parts. Be sure that the seed-metering mechanism, coulters and press wheels are adequate for your crop and conditions. Before beginning to plant, take time to adjust coulter settings and seeding depth, and to calibrate the drill.
Steps for successful no-till establishment of forages
Research and farmer experience have shown that most forage crops can be planted using no-till methods.Forage species may differ in many of their characteristics (seedling vigor, tolerance to shading, etc.), but the basic principles for successful no-till establishment are the same for all forage crops. Following are a few important details to be successful in obtaining a stand using no-till.
• Fertilize according to soil test.
Conditions in the field need to be manipulated so the environment created favors the forage to be planted. The first step in creating a favorable environment is to provide nutrients needed for seed germination and seedling growth.
An optimum pH, plus adequate nitrogen, potash and phosphate are required by the plant. The more acidic the soil, the less of these nutrients available and the more conditions favor weeds over forage.
Lime and fertilizer applications should be based on soil test results and can be applied to the soil surface. Even though the lime and fertilizer are not incorporated in the soil, they will still be effective. Fertilizer can be applied at planting, while lime needs to be applied as far ahead of planting as possible.
This is especially important for sensitive crops like alfalfa. For sensitive crops, if the pH is below 6, lime should be applied six to 12 months prior to seeding.
• Plant at the proper time.
Seeding date is very important for successful establishment of forages. All forages have specific environmental conditions that result in their peak production.
The response that a plant has to environmental conditions will be most dramatic when it is a seedling. Plants need to be seeded when temperature, day length and moisture favor young seedlings. Recommended seeding dates for several forage crops are listed in Table 1.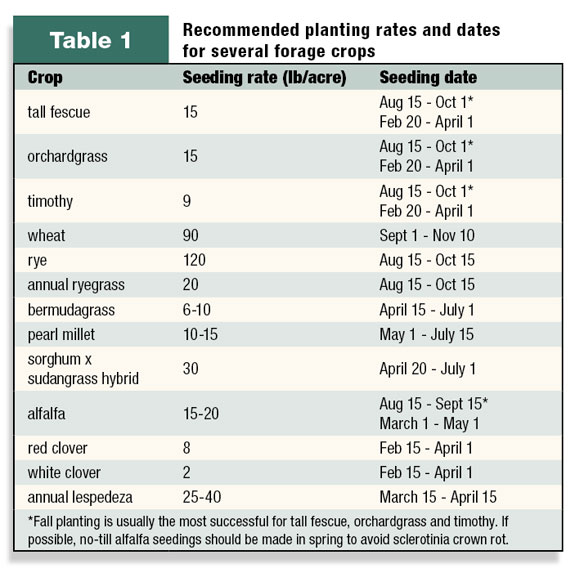
• Plant the proper amount of seed.
Maximum production from a hayfield or pasture can only be achieved if enough forage plants are present to provide the yield. If only half a stand of alfalfa or tall fescue is present, no amount of fertilizer can be added to produce maximum yield.
Because of this, it is important to plant enough seed to ensure a full stand.
Calibration charts are usually correct when drills are new, but as they get older and parts wear, seeding rates may be significantly higher or lower than recommended rates.
Spending a few minutes before planting can prevent all of the seed being placed on a small portion of the field or having to run over the field twice because the drill wasn’t putting out enough seed. Recommended seeding rates for various forage crops are listed in Table 1.
• Plant when moisture is available.
Water is the most critical nutrient for plant survival. Without nitrogen, potash or phosphate, a plant might not be very productive, but it should still be able to survive. A lack of water will result in the slow death of a plant.
When using a no-till drill to plant a forage, you must have adequate soil moisture available for success. You are depending on the drill to slice open a furrow in the soil, drop the seed and then press the soil together for good soil-to-seed contact.
If the soil is dry, it may be too hard for the disc openers to get into the soil, and soil-to-seed contact will be poor. A poor stand may result, because seed was dropped on top of the ground instead of being placed in the ground.
A second reason adequate moisture is needed for successful no-till is because moisture is needed for the seed to germinate. Some no-till drills are heavy enough that they can penetrate the soil no matter how dry and hard it is.
If the soil is dry, however, the seed will not germinate until rain comes. Often there is just enough moisture for the seed to germinate and begin to grow, but before the root system can get established, the seedling dries up and dies from moisture stress.
• Plant at the proper depth.
A common error with no-till planting is placing seed too deep in the ground. The first few weeks of a seedling’s life are the most difficult. When a seed germinates, it must push its way through the soil to the surface so it can receive sunlight.
Once in the sun, it can produce its own energy. Until that happens, it must depend on energy stored in the seed to grow.
The deeper a seed is planted, the more energy required for it to emerge from the soil. Some seeds are relatively large and should be planted deep. Other seeds are small, and have very little energy stored.
These seeds should be planted very shallow. Table 2 gives recommended seeding depths for many forage crops.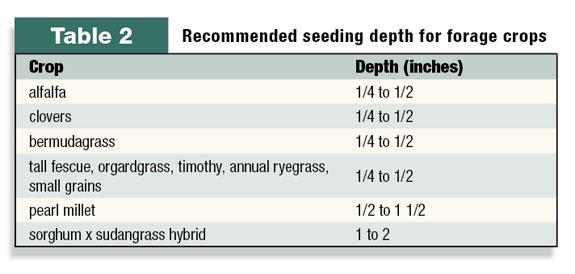
No-till drills vary in the method used to control coulter seeding depth. Coulter depth on some drills can be adjusted by adding or removing weights to the drill. Some drills have a hydraulic mechanism that can be raised or lowered to adjust coulter depth.
A variety of mechanisms are used to adjust disk opener depth. When the drill is being calibrated for seeding rate, several furrows should be checked to determine the depth the coulter is cutting into the ground and the depth of seed placement.
• Control weeds at planting.
The purpose of no-till is to maintain cover on the area and decrease soil loss because of seedbed preparation. Successful no-till depends on killing all vegetation at planting, decreasing competition for young seedlings.
For recommendations concerning specific herbicides to use, as well as rates and dates to spray, check with your local extension office. Do a good job with burndown before planting. Competition from weeds can result in a partial or total failure of a no-till stand.
No-till plantings can be successful, as long as the proper procedures are followed. If a no-till seeding fails, the reason can usually be traced to one of the points listed above.
Planning ahead for soil testing, drill calibration and weed control are critical steps. It is also important to use patience and wait for rain. Planting into a dry seedbed can cause the death of a stand. Preparation is the key to success in no-till plantings.
—Excerpts from the University of Tennessee Extension website