Exhaust leaks can be dangerous to the operator but also may rob your truck or equipment of needed power. Because turbo chargers rely on exhaust pressure, leaks between the turbo unit and the exhaust manifold will reduce the performance of a turbo-charged engine.It is not uncommon for the heat generated by the high demands of a farm truck or machine to crack the cast-iron exhaust manifold.

With the added resistance created as the exhaust is forced to spin the turbine, a crack in this part of the system will allow a large amount of exhaust to escape. This creates a potential hazard to the operator, as the cab air system can draw the carbon monoxide from the exhaust into the cab as well as depleting the engine’s potential for power and economy.
Cracks and breaks between the manifold and the turbo should either be welded or the affected parts replaced.
There are several steps you can take to repair a crack in an exhaust manifold. Some exhaust system leaks can be addressed in place on the vehicle or machine, but to repair a manifold crack, you need to remove the manifold from the engine.
Historically, those of us that are not proficient welding cast iron would not tackle a project like this but would take the manifold to a local welding shop or individual with much more experience welding cast iron. Today, armed with a few tips and the advent of rods such as Muggy Weld 72 electrode, we can tackle a crack in an exhaust manifold with much more confidence.
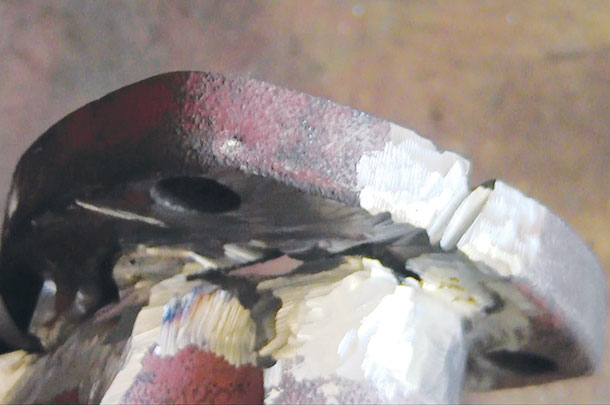
After you have removed the manifold, clean any oil and dirt off of the manifold using a lint-free cloth. Prep the weld by grinding out the crack half to three-quarters of the way through the material and drill the ends of the crack in order to prevent the crack from continuing to run after welding.
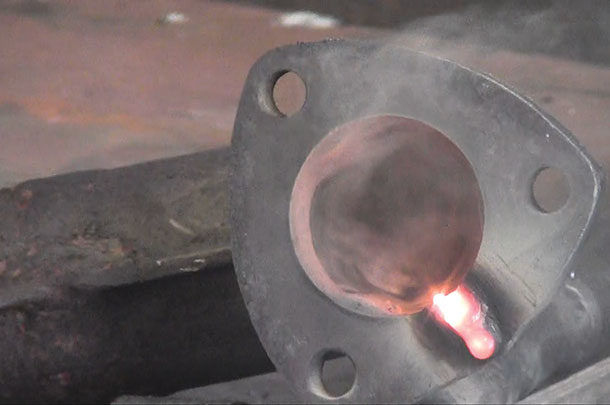
Preheat the cast iron with a torch or forge to a dull red. Weld 1 inch at a time using short arcs with low heat to avoid overheating the cast iron.
Robert Jensen, a professional welder and metal fabricator near Salmon, Idaho, said, “If your bead is blobbing, you need more heat. If the weld is undercutting the cast, you are using too much heat.”
Maintain preheat between beads. Jensen says this is done more easily with a helper using a torch. If cracking occurs during cooldown, weld over the first bead with Muggy Weld 77 or similar rod. After the weld is complete, it is important to allow the cast iron to cool slowly.
Jensen says, “It is a good idea to allow cast iron to return to a normal temperature by submerging the finished work in a bed of sand or cat litter overnight.”
Exhaust leaks beyond the turbo charger do not deplete engine power but still may pose a health hazard to the operator and should be repaired. This is especially risky with farm machinery, where the entire exhaust system runs in close proximity to the cab’s air supply intake.
Unfortunately, it seems, machinery breakdowns often occur when we are in the middle of a job that is time-sensitive and we must deal with the problem quickly and get back to work. Fortunately, many of the problems occurring past the turbo charger can be addressed without dismantling the entire system.
While replacing sections of the system or welding cracks may be the best permanent solution to any exhaust leak, there are several very good remedies to leaks occurring after the turbo charger. It is not uncommon for cracks and holes to develop in areas of the exhaust system where heat is focused or moisture may collect.
The outside of elbows in the piping is an area where heat and rust weaken the wall of the pipe, creating a crack or hole.
A crack may be welded fairly easily, but a large hole is much more difficult to close with a weld. These holes can be remedied by using muffler repair tape or flex pipe/tubing.
If you have fairly good access to the hole, you may consider using muffler repair tape. Before applying the tape, remove any dirt or grease from the affected area of the pipe. Make sure the pipe is above 70ºF, idling the engine for a few minutes if necessary to warm the pipe. Wrap the tape around the pipe, covering the hole to a thickness of about 1 inch.
Secure the ends of the tape with wire or clamps. Next, start the engine and idle for 20 minutes or until the tape fuses completely to the pipe. This patch is now complete, and you can remove the clamps or wire.
In cases where the hole in the exhaust system is in a hard-to-reach place, or the pipe is broken, I have used exhaust flex pipe to replace the damaged area. Use a hacksaw or reciprocating saw to remove the rotten or broken piping. Measure the gap in the original pipe and allow about 4 inches extra length when prepping the flex pipe.
This will provide a couple of inches on either end of the flex pipe for clamps. Slide the clamps onto each end of the original pipe and then work the flex pipe onto the original pipe, splitting the difference of the overlap. Check to make sure the flex pipe will not touch a flammable surface and secure the clamps. ![]()
Michael J. Thomas is a freelance writer based in Salmon, Idaho.
PHOTO 1: Exhaust manifold after being welded.
PHOTO 2: Exhaust manifold prepped for welding. Photos by Michael J. Thomas.