Clean and prep
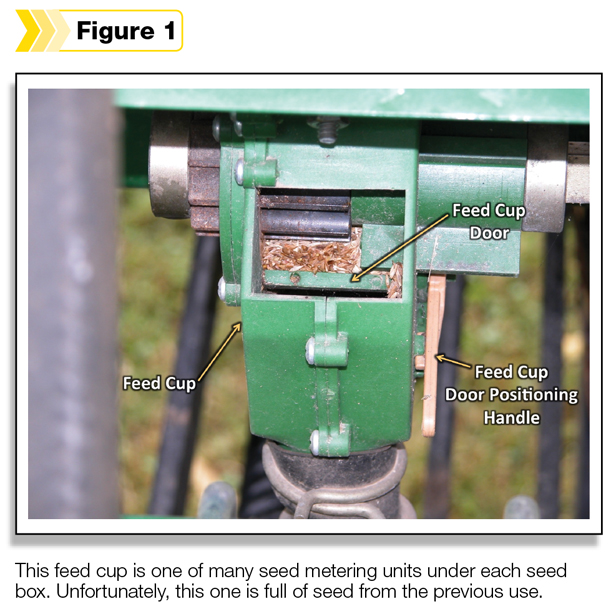
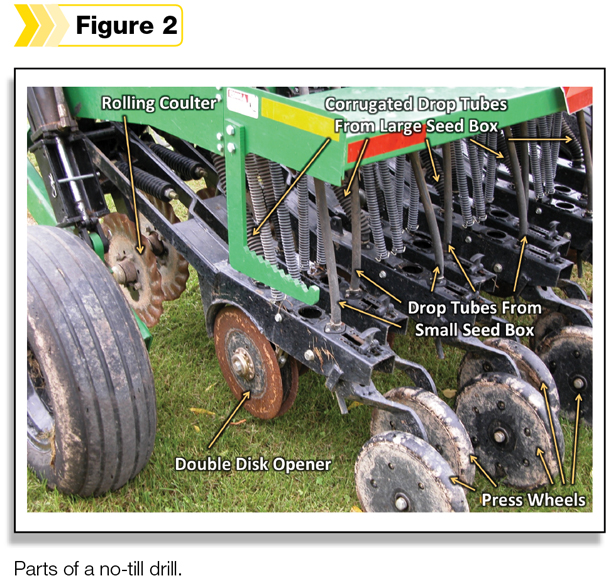
Those who grew up on a farm probably were forced to develop an appreciation for the importance of hitting every grease fitting and lubing every chain. On a drill, that is a good start, but there are a lot of other parts that need attention, too. Almost always, at least one of the drop tubes or feed cups will be clogged (See Figures 1 and 2). Spiders seem to have an affinity for drop tubes. Loosen the clamps and pull the drop tubes. Use compressed air or something similar to blow out the tubes. Test that it is clear of obstruction with little wads of paper.

It is also common that the previous user failed to clean out the hopper or metering units. This is especially common if one is using a rented or borrowed drill. Use a vacuum or compressed air to clear the hopper and feed cups of any foreign material.
Set the rate and calibrate
Check to make sure that the feed cups are set up according to the manufacturer’s instructions. The manufacturer provides recommended settings for many species, but their listing will likely not cover every forage species. If the seed being planted is not listed, one will have to approximate the setting based on the setting for a similar seed that is listed. Also, ensure the metering units are properly set before pouring seed into the box, otherwise one may have difficulty adjusting the opening or be left with neat little piles under each row because the seed fell right through.
The manufacturer’s recommended settings are a great place to start, but they may not be sufficiently accurate. These recommendations are not always perfect, nor do they account for normal wear with the moving parts. The consequences of a seeding rate that is too high or low are great, so take the time to calibrate. Most drill manufacturers provide a step-by-step guide to calibrating their drill in their owner’s manual. Other methods for calibrating a drill can be obtained through your local extension office.
Adjust for proper planting depth
Forage species differ in their recommended planting depth, so ensure the drill is set for the right depth. Drill models will differ in their setup, but there are three planting depth adjustments that are fairly universal. First, one can adjust the planting depth by adjusting the cutting depth of the rolling coulter in the front of the drill. As a rule of thumb, the coulter should be cutting twice as deep as the planned seeding depth. So, if the desired planting depth is one-half inch, then the coulter should make a 1-inch slice into the sod. This is usually adjusted by a “depth control” knob or hydraulic setup.
Second, ensure that the springs above the opener are providing sufficient down pressure (see Figure 3). Typically, there are one or two springs for each row unit that pushes the opener down. These may be placed on their lowest down pressure setting when shipped from the manufacturer. This may be sufficient down pressure, at least at the start. However, these springs may lose tension over time and not provide enough down pressure. To create more down pressure, shorten the length of the spring’s travel according to the manufacturer’s instructions.
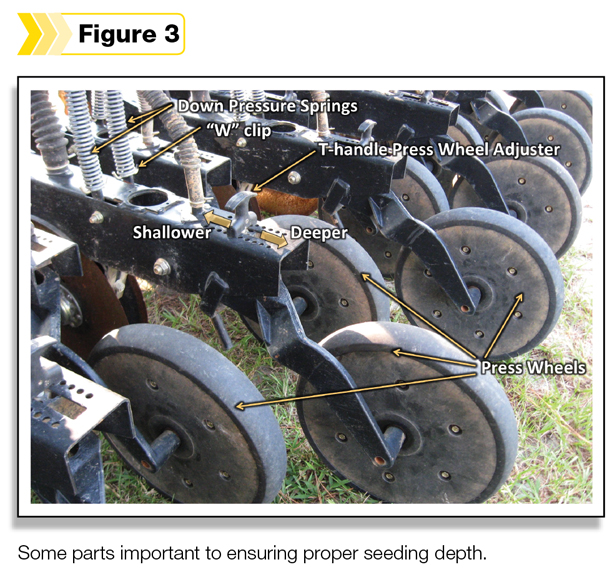
The final step, adjusting the press wheels correctly, is equally crucial to planting depth control. Most press wheels have a T-handle that can be adjusted forward (toward the tractor), allowing the depth to be shallower, or backward (toward the press wheel) to enable a deeper seed placement. The press wheels are designed to ensure the openers aren’t pushed too deeply by the springs. The press wheels work in tandem with the springs to create what is called “reserve power.” In other words, as the properly adjusted press wheel traverses the rough terrain of pastures and hayfields, there is enough travel in the spring that the openers are always positioned at the right depth.
When checking depth, carefully scrape away the soil from the middle of the furrow outwards. Measure the depth relative to the soil surface. Note that the layer of thatch or residue is not included in the planting depth. Remember that conditions often vary within the field and will change throughout the day. Regularly check seeding depth and adjust the drill accordingly. ![]()
Quick tip: To more easily find the seed when adjusting planting depth, use a quart-sized bag full of seed that has been lightly sprayed with orange.

-
Dennis Hancock
- Forage Extension Specialist
- University of Georgia
- Email Dennis Hancock