Kurt Ruppel, in the 2002 Cargill Dairy Report, researched some steps we can take to help in decreasing ash content in our hay forage crops. His first recommendation was to not apply manure to hayground within three weeks of mowing.

That just makes sense: By waiting until after mowing or applying manure before the three-week time limit, we give the manure time to incorporate into the soil profile.
Ruppel’s other findings were a bit more dependent on the proper setting and use of harvesting equipment. He used three windrow treatments where a disc mower/conditioner was used at a setting too low. His research showed the optimum setting for disc mowers and mower/conditioners was at or above 3 inches.
Running the mower at a lower setting allowed the mower to either “cut into the soil” or pull soil into the hay via the vacuum the mower created while operating.
The way to check your disc mower is simple enough. Attach the mower to your tractor and park it on a level surface, such as your shop floor. Lower the mower into its cutting condition (floating) and measure the distance between the ground and the blade tips.
If the distance between the two is less than 3 inches, adjust your mower by rocking the mower head up, thereby raising the cutting height.
While it might be tempting to increase the yield on that particular cutting by keeping the mower head low, you will find that by leaving more green material in the field, the plants recover more quickly, grow faster and more efficiently make the next cutting.
Another benefit you will notice is that by leaving a bit more of your haycrop behind, weed pressures are lowered within the intended crop, especially in grass hays. If you will recall your high school biology, green leaves capture sunlight in photosynthesis and turn it into energy.
Broadleaf weeds are more efficient at capturing sunlight than a narrow grass blade, so getting the grass to grow and shade out the broadleaf weed helps control them.
Another piece of equipment Ruppel looked at was the hay rake. While the “book value” of ash content in hay runs about 8.5 percent, an old hay rake can almost double that amount. Ruppel looked at new rakes as well, and while their contribution to ash percentages in hay were lower than the numbers for an older rake, they still increased levels over the book value by 50 percent.
So is it best not to rake? Not at all. Research also shows hay left in wide, shallow swaths dries much more efficiently than hay piled in tight, deep windrows. Scattering the hay off the conditioner rolls allows the sun to penetrate the swath and dry the hay. It also means a rake or a merger needs to be used to reduce the need for the pickup head of the baler or forage harvester to chase the hay.
Properly adjusting the height of your rake carries the same importance as setting the mower cutter bar, and for the same reason – to reduce the amount of soil swept into the windrow. With wheel rakes, this is tough just because they depend on some contact to drive them forward and create the sweeping action.
Power takeoff-driven rakes are easier on the ground, but you need to match your ground speed with the power takeoff speed to keep from thrashing the hay and losing leaves.
With roller bar rakes, you never want to set the rake so low the teeth brush the ground. As many of you know, even on the most level fields there are undulations and holes that can drop one side of the rake or the other. Hitting these with a properly set rake is tough; hitting these with a rake running too low usually puts not only soil but rake teeth in your hay.
Which leads me to an important point: What do you do when you find that your rake is missing a tooth? Replace it? Not too many years ago, a friend who wanted me to inspect his hay rake approached me. “There is something wrong with it,” he said. “It loses the same tooth on the same bar every time we take it out. It has to be out of time or something. Something just isn’t right.”
I asked him about the new teeth and if he noticed they lasted a shorter and shorter period of time after replacing. When he answered that he believed they did indeed fail faster and faster, I had a good idea what was wrong but wanted to visit him and see the rake to be sure.
On the way over, I stopped by the store where he bought his replacement teeth and produced the new tooth as we walked to the rake. “Do you think the new teeth are bad?” he asked. Not at all.
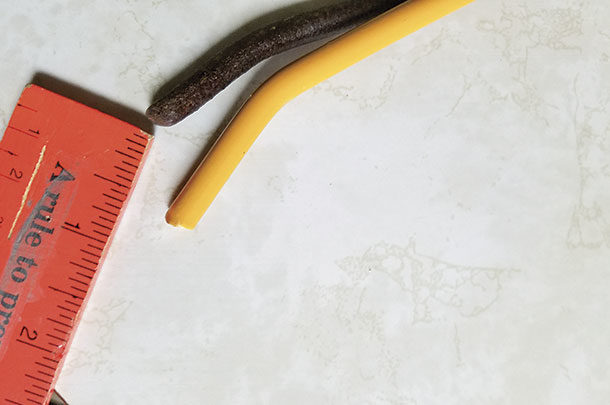
I didn’t buy the tooth to test its quality – but rather compare its length. Sure enough, when I compared the new tooth to the old ones on the rake, it was a full 1¼-inch longer than its buddies. I then shared with him some wisdom my dad imparted to me many years ago: Don’t replace teeth; rebuild the rake (or pickup). By replacing the teeth of his rake a tooth at a time, he guaranteed the tooth that was running closest to the ground was always the newest tooth.
In fact, when the other teeth were raking at the proper height, the new tooth was running (in this case) 1¼-inch too low. Of course, it failed first.
The same goes for your hay pickup on your balers or forage harvesters; never replace the single missing tooth. A longer tooth will be adding soil while the others are gathering hay. Instead of replacing a tooth or a few teeth, wait until the missing teeth really affect the ability of the equipment to do its job.
Then replace every tooth in the rake or pickup head, put the old ones in a box, label the box and put them up where you can find them. After that, if you are missing a tooth, you have a supply of “free” pre-worn teeth that may match the teeth that you have on the equipment.
So check your equipment and make sure they are not “cutting away” at your hay’s quality. Keep it clean this hay season. ![]()
PHOTO: This compares a new rake tooth (yellow) to a used one (brown) off Andy’s own rake. Even though he rebuilt it recently, a new tooth is still about three-quarters of an inch longer. Photo by Andy Overbay.

-
Andy Overbay
- Extension Agent
- Virginia Cooperative Extension
- Email Andy Overbay